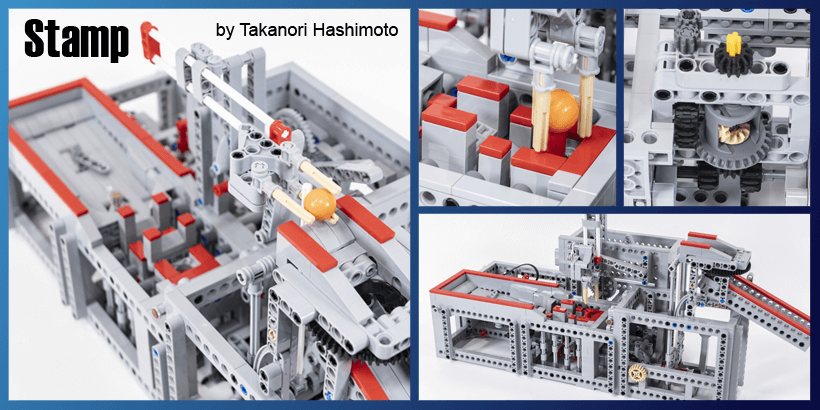
Looking for a striking GBC module ? Then Stamp GBC module from Takanori Hashimoto is what you’re looking for. The main articulated arm of this massive GBC module delicately catches up your GBC balls to take them one by one to an exit ramp. An LEGO Technic axle moving up and down prevents the balls from leaving the exit ramp. The main arm moves extremely smoothly, in total harmony and synchronisation with the movements of the LEGO Technic axle. Once again a very inspiring GBC module from Takanori Hashimoto, which you can reproduce and add to your GBC collection thanks to his building instructions.
Original design by: Takanori Hashimoto
Number of parts: 1345
Complexity for building: 
Price for Building: €€€, average
Stamp, on Takanori Hashimoto YouTube channel
Takanori Hashimoto performed some enhancements to his module to make it more reliable (building instructions are corresponding to this enhanced version):
 |
Stamp – from Takanori Hashimoto
Building Instructions + Parts List 14,00€
|
|
>> More information |
|


Planet GBC Building Instructions and Ready-to-Build LEGO sets are just waiting for you !


Buy your GBC balls without breaking the bank !!
Quercetti marbles - 100 balls refill
GBC-compatible balls
Best Price6.90 EUR
Buy NOW


Share this Planet GBC article on your favorite social media!
Step 369 is very confusing, is there an error? I don’t understand how the L-arm mounts
It’s a 5 x 3 L shaped lift arm and it fits externally. It holds the chute at 80 degrees (if you want it in that position).
The centre of the 3 part of the lift arm pins to the top hole of the 13 x studless beam.
Sorry, I meant to type ’90’.
Step 369 is very confusing, is there an error? I don’t understand how the L-arm mounts
I’ve sent you the step under a different angle. I’ll update the building instructions accordingly. thanks for your feedback
I have completed this build, but I find it incredibly frustrating to get the timing to work correctly. I may get it to work for a few balls in a row, but then it goes out of sync again. Any hints to getting it to work?
Is it skipping teeth?
Do you get a clicking sound?
I made some adaptations to this module because there was too much resistance in the mechanisms.
The adaptation made the whole thing move freely. If you want to know what I did, let me know.
Are the instructions for sale to build the original or improved version or both versions?
the instructions are for the improved version (the new one, with the extra wheel which allows a more easy setup of the module timing)